Join my news Letter

Join my news letter

Subscribe

* indicates required
Showing posts with label scrapbooking Page. Show all posts

Thursday, October 26, 2023

Scrapbook Layout Them Bones


Welcome Stampers to our Creative Cardiology Team October 2023 Blog Hop! For this month we're showcasing projects to do with  the Scrapbooking / Sampler. I do a scrapbooking class each month and this is the Layout we are going to be making for are October class. I choose to use the Bag of Bones stamp and paper. I tried to make the photo mats look like tombstones Do you scrapbook or do samplers?  Let me know in the comments below. 

Here are the details of my scrapbook page:
(2)  sheets 12 x 12 basic gray or black will work 
(2)  sheets 8 1/2 x 11 Blueberry bushel
(2) sheets  8 1/2 x 11 basic Gray
(1/2) sheet 8 1/2 x 5 1/2 basic white
Pack of DSP Called Them Bones 

First thing you need to do is heat and emboss the white stars. On the blueberry bushel paper. I used the star from the Merry and Bright stamp set. ( if you need to know how to heat and emboss check out this video)
Next take the bat from the Bag of Bones stamp and black Ink and stamp in-between the stars. 
Now sponge the outside of the blueberry bushel paper with black Ink
Now you can add them to your scrapbooking Basic Gray or Black 12 x 12. One on each side. Look at photo one goes vertical and one goes horizontal. If you used Basic Gray 12 x 12 you will need to sponge around the outside with black ink.

DSP Them Bones Look at photo and pull out the same paper that i used. 
The DSP with Tombstones- Cut in 1/2  (6 x 12 )
The DSP with Houndstooth orange Cut that (3 x 12
The DSP with dancing skeletons Cut that (2 x 12) 
The DSP with all  cutouts pick the one that looks like  the  one on the left side of my layout.

Now add them to your pages as seen in photo. Note the dancing skeletons overlap the houndstooth. When putting down the Houndstooth start at a 1 1/4 over.

Now take the 8 1/2 x 5 1/2 white and stamp 3 skeleton bodys, 2 dogs and 2 cats in black ink and die cut them out with the dies.

Photo Mats
(3) 4 1/4 x 6 1/4 
(2) 3 5/8 circles 
(1) 3 1/4 circles

Note I used the retired circle die but i think the Deckled Circles  dies would look really cool on this page.

Now if you went to make them look like tombstones you will need to use the Basic Borders Dies to cut the tops off a little. Then I just took a black marker and outline the photo mats see photo above.

Photo size for mats with out them looking like tombstones are 
(3) 4 x 6 , (2)  circles 3 1/2, (1) circle  3 1/4

Photo size for mats with tombstones look.
(1) 4 x 5 5/8, (2) 3 x 5 3/4 , (2) circles 3 1/2 (1) circle 3 1/4 

Now add your mats and skeleton figures to your layout. 
I did not add a title to my page up but there is room for one on the left side of my layout. 
Also you can always use one of the circle for a journaling spot instead of a photo.

If you could take a few minutes to do me a favor and check out my other team members pages. We all work very hard on these blog hops. Just let them know you hop over from Bonnies Creative Place. If you could leave me a comment and share my page it will help my blog grow. 

If you would like to get a monthly newsletter from me the link is at the top of this page.
 
Thanks for stopping by. Bonnie~

Product List
Bag Of Bones Bundle (English)
$51.25
Merry & Bright Photopolymer Stamp Set (English)
$20.00
Them Bones 12" X 12" (30.5 X 30.5 Cm) Designer Series Paper
$12.50
Neutrals 12" X 12" (30.5 X 30.5 Cm) Cardstock
$13.50
Blueberry Bushel 8-1/2" X 11" Cardstock
$10.00
Basic Gray 8-1/2" X 11" Cardstock
$10.00
Basic White 8 1/2" X 11" Cardstock
$10.50
Basic Borders Dies
$29.00
Deckled Circles Dies
$37.00
Basics Embossing Powders
$18.00
Heat Tool (Us And Canada)
$31.00
Tuxedo Black Memento Ink Pad
$6.50
Versamark Pad
$9.50

Thursday, June 16, 2022

July Scrapbooking Class Work


Welcome Stampers to Crate with Bonnie Blog ! I am showcasing my July's scrapbooking page.   I have chosen to use to do a 4th of July layout.  A lot of the supplies are older Stampin Up items. The firecrackers are not Stampin Up I have that die set for years.  I hope you enjoy my layout.  Thanks for stopping by There links are below my name. 
Leave me a comment below it means a lot to me and
 subscribe to my so you do not miss any of my post.
Bonnie~
Fine me on YouTube , Tic Toc, Facebook Under Bonnies Creative Place

Saturday, May 28, 2022

Love Bug Scrapbooking Page Layout and a bonus layout


Welcome Scrap Bookers and Friends, Here to another Fun Saturday of Scrapbooking . So like a said last week for every Saturday in the month of May I am going to be showcasing projects to do with scrapbooking. For the last week  I decided to use the Hello Ladybug bundle. I did this for a May Scrapbooking and I also made a video. When you see my pages you may find some paper, dies, or stamps that are not current. We are in the meddle of a catalog transition. I will do my best to keep things current but I know some of my layouts will not be all current product.  I will give you suggestion on other product to use. I am here to inspire and share my scrapbook layouts with you . To help you get your creative juices flowing! I will have a supply list below if  would like to support me by placing a order with me at bonniescreativeplace.stampinup.net  Hope you enjoyed my little series of scrapbooking pages. 
Please leave a comment below. 
Bonnie~

Measurements:
Cut Real Red Card Stock in 1/2 - 11 x 4 1/4 
Gingham DSP is 10 3/4 x 4 need two
Green DSP is 12 x 2 need two

Photo mates 
Black card stock 
need two 4 1/4 x 6 1/4 fits a 4 x 6 photo
need four 3 1/2 x 3 1/2 fits a 3 1/4 x 3 1/4 photo

you will need to punch/ die cut four 2 1/2 inch circles from white cardstock
you will need to stamp 7 ladybugs and 4 flowers 

Die cut out Title in real red scraps 


Here is another layout idea you make with this Ladybug Bundle
Making Bees with the Ladybug Bundle.
with just changing the paper and using  few other product. I just add embossing folder Hive 3D embossing folder, Beautiful shapes dies and used the grass for the Oceanfront stamp set.
I used Bermuda Bay and Flirty flamingo ink For the flowers
I Drew the stem and leaf for each flower with a old olive maker add grass with a stamp for the Oceanfront stamp set. I used Vellum to make the Wings.
I did not add a title to this page but if you fill you need one her are a few
Honey Bee
Bee Happy
Bee-utiful
Sweet As Can Bee


Product List
Hello Ladybug Bundle (English)
$32.25
Real Red 8-1/2" X 11" Cardstock
$8.75
Pattern Party 12" X 12" (30.5 X 30.5 Cm) Host Designer Series Paper
$18.00
Layering Circles Dies
$35.00
Basic White 12 X12 (30.5 X 30.5 Cm) Cardstock
$7.75
Tuxedo Black Memento Ink Pad
$6.00
Real Red Classic Stampin' Pad
$7.50
Granny Apple Green Stampin' Pad
$7.50
Daffodil Delight Classic Stampin' Pad
$7.50
Iridescent Rhinestones Basic Jewels
$7.50
Add items for Bee scrapbooking pages
Product List
Oceanfront Photopolymer Stamp Set
$22.00
Hive 3 D Embossing Folder
$9.00
Beautiful Shapes Dies
$29.00
Crushed Curry 8-1/2" X 11" Cardstock
$8.75
Daffodil Delight 8-1/2" X 11" Cardstock
$8.75
Daffodil Afternoon 12" X 12" (30.5 X 30.5 Cm) Designer Series Paper
$0.00

Thursday, May 26, 2022

Blog Hop Scrapbooking Page Layout


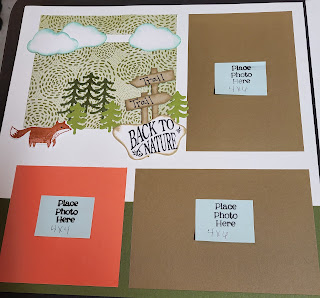
Welcome Stampers to our Creative Cardiology Team May 2022 Blog Hop! This month we're showcasing projects to do with scrapbooking. If you did not know May is National Scrapbooking Month. I have chosen to use the  Happy Forest Friends Suite for my layout.  I have a list of supplies with the layout details below. Thanks for stopping by and please take the time to check out my other team members pages. There links are below my name. If you would like to join my monthly scrapbooking workshop Email me at cre8_withbonn@yahoo.com.
Leave me a comment below it means a lot to me and
 subscribe to my so you do not miss any of my post.

~Bonnie~


Layout Details:

(2) 12 x 12 Basic White for Base
(2) 3 1/3 x 12 Mossy Meadow
(1) 6 x6 Happy Forest Friends DSP
(1) 4 x 6 Happy Forest Friends DSP
(1) 1 x 6 Happy Forest Friends DSP
(1) 5 1/2 x 4 1/4 you will need one of each color Mossy Meadow, Crumb Cake, Old Olive for die cutting
(1) 3 x 3 Calypso Coral for die cutting 
(1 ) 8 1/2 x 11 Basic white for stamping and die cutting 
(2 ) 8 1/2 x 11 Soft Suede for photo mats
(1) 8 1/2 x 4 1/4 Calypso Coral for photo mats

Title:
You are going to cut  (2) crumb cake 1/4 x 4 and (2) Crumb Cake 1/2 x 2  you will write Trail on both of these and then cut points at the end and add them to the top of the  1/4 x 4 pieces. Add them to the back of the title pieces see photo. For my Title I use my Circut Joy with a black maker and die cut it out with the layering Diorama Dies. You can always use stamps, dies, stickers or your own hand writing to make the title.

Photo Mats:

(4) 4 1/4 x 6 1/4 mat and photo size 4 x 6 Soft Suede 
(2) 4 1/4 x 4 1/4 mat and photo size 4 x 4  Calypos Coral

Product List
Happier Than Happy Bundle (English)
$48.50
Happy Forest Friends 12" X 12" (30.5 X 30.5 Cm) Designer Series Paper
$12.00
Basic White 12 X12 (30.5 X 30.5 Cm) Cardstock
$8.25
Neutrals 12" X 12" (30.5 X 30.5 Cm) Cardstock
$13.00
Mossy Meadow 8-1/2" X 11" Cardstock
$9.25
Soft Suede 8-1/2" X 11" Cardstock
$9.25
Crumb Cake 8-1/2" X 11" Cardstock
$9.25
Old Olive 8-1/2" X 11" Cardstock
$9.25
Calypso Coral 8-1/2" X 11" Cardstock
$9.25
Pool Party Classic Stampin' Pad
$8.00
Crumb Cake Classic Stampin' Pad
$8.00
Layering Diorama Dies
$29.00
Cloud Punch
$18.00
Basic Black Stampin' Write Marker
$3.00